My mom and sister have been on a cross-stitch kick. I thought it would be nice to surprise them with a 12-day Christmas Cross Stitch. Unsurprising, I have learned some things along the way and thought it would not only be fun to share my experience but to share the patterns with everyone for free! I know that the “12 Days of Christmas” starts on Christmas Day but I always think it is more fun to start them on December 14th so the last day ends on Christmas Day.
If you haven’t had a chance to read the About Exploring Slowcraft page or read the newsletter explanation on the main page, here’s a quick overview: This isn’t your typical blog site. Instead of creating new posts, I’ll be updating existing ones, creating a continuous storyline for each exploration. If you enjoy these posts, bookmark the page or subscribe to the newsletter (coming soon). The newsletter will keep you informed about new content and updates to older posts. Given the nature of slowcraft, updates will not be often. This 12-Days of Christmas Cross stitch being my first official post on this site that I will be updating will help me get into the routine of posting. Be sure to check back each day for the new PDF!
Things I have learned while Designing:
The most stand-out discovery in my limited cross-stitch experience, I’ve noticed that the final stitched project looks different from the design program. I have seen Etsy shops that sell patterns, only showing the digital form and I have always thought it would be nice to see it stitched before I purchase the pattern. Now I know (for myself), that this is a critical step to the success of the pattern. This took a lot of trial and error, constantly tweaking the designs. Working on these 12-day Christmas Cross stitch patterns, I’ve unstitched, ripped out, and remade them a quite few times. And they are still far from perfect.
I opted for an off-brand floss, deviating from my usual preference for DMC. An online yarn shop was clearing out this unknown floss, and I thought, why not give it a try? While it looks great, it is an unmercerized cotton floss, unlike the mercerized DMC floss. What does this mean? The unmercerized option is a matte floss that has a softer, fuller look. As nice as that sounds, it also snags/knots more and has a very limited colour pallet. This is not bad floss, just good to know that all floss has different pros and cons to them and understanding their limitations can also help bring out the potential. For example, using matte floss for fur on an animal and the shine of the mercerized floss for the eyes can add dimension and life to the whole project. I didn’t do this example in any of the patterns below but something to put in my back pocket for future projects.
While the original patterns were designed on 14-count Aida cloth (my family’s preferred cloth count), I’m currently stitching them again but on 18-count Aida cloth. If you decide to do an 18-count Aida coth, know that the patterns will become small in size. It’s also worth noting that not everything transfers seamlessly to a finer count. Some lines become closer and optical mixing starts to happen. Optical mixing is when two colours sitting side-by-side start to blend together. In some of these projects, it works beautifully. In others, the definition will become a bit lost, losing some of the charm. I will explain further when I get to those relevant patterns below.
A few notes about the patterns:
- I used a 4-inch hoop to secure my fabric, but feel free to choose a larger hoop or skip it altogether, whatever you prefer. The square count for each design is always between 35, 36, or 37 stitches, ideal for combining them on one larger fabric as well.
- I chose to hold two threads of floss for both the 14-count and 18-count Aida cloth. The fullness of two threads complements the 18-count Aida, while it appears sparse on the 14-count Aida. I did experiment with holding three threads on the 14-count Aida, but it proved just slightly challenging to pull through the holes. A mercerized floss would make for a smoother glide through the cloth, though it may still feel a tad snug. Of course, this is a choice entirely up to you. If you would like a side-by-side comparison, the images on the left (above) are on the 14-count Aida, while those on the right (below) are on the 18-count Aida cloth.
- Feel free to use any colours you have on hand. After creating patterns for my family and giving away my samples, I’m remaking (most of) them in completely different colours for myself. It’s really fun and freeing to choose colours that speak to you; no need to stick to specific colours.
- Lastly, I’ll provide only a brief overview of how I finished them; the details are up to you. Enjoy the process and finish it in a way that brings you joy!
Day 1: Candy Cane

I finished this cross stitch by filling it with leftover scraps of Aida cloth and using a blanket stitch along the sides. A magnet was attached to the back, which happens to be scrap fabric. I really enjoy using dark brown as an outline colour as it gives a softer feel to the finished piece.

Day 2: Reindeer
I decided not to restitch this on 18-count cloth but I did stitch it twice on 14-count cloth. In some spots, I held three strands (mouth, nose, and antlers). As mentioned earlier, three strands appear fuller but it is slightly more resistant to pull through.

I have removed the original 14-stitch count sample photograph because it was very poor quality. This version has much more charm!
I also finished it by filling it with Aida cloth scraps and adding a magnet to the back just like the candy cane sample shown above.
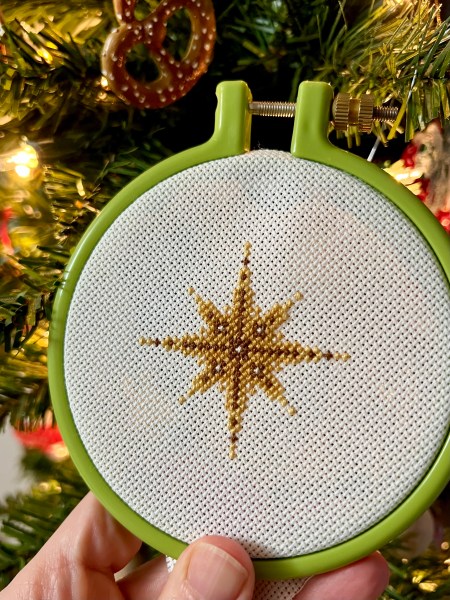
Day 3: Star
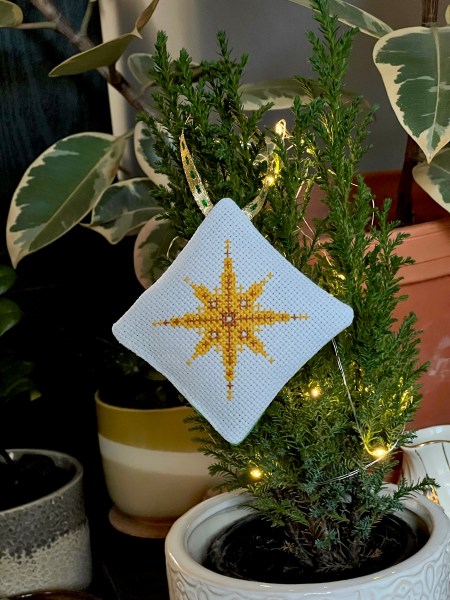
The Star is one of my favourites. When stitched on an 18-count fabric, it looks a bit compressed and the dark brown lines become more pronounced. I’ve also played with a fading yellow hue gradually, which I highly recommend!
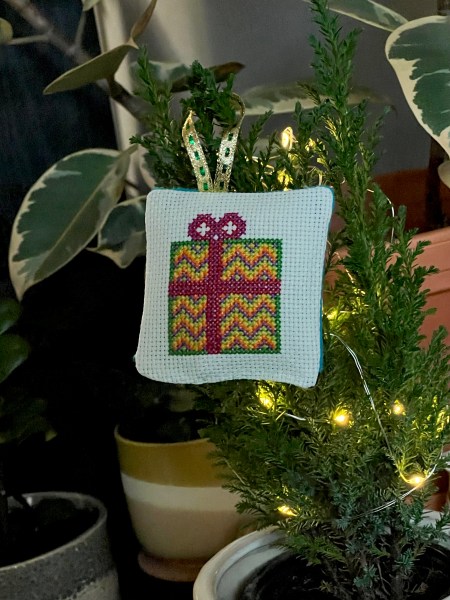
Day 4: Gift
Finished this cross stitch sample (and the next few samples) by sewing them onto scrap fabric, filling it with wool stuffing, and hanging it from repurposed ribbon.
I did not make a second version of this cross-stitch.
Unfortunately, every time I attempted to photograph the 14-count cross-stitch samples, it was always overcast. I’ve noticed that in person, these 14-count samples appear more vibrant and full compared to their photographs. I have tried my best to fix them without making them seem overly edited.
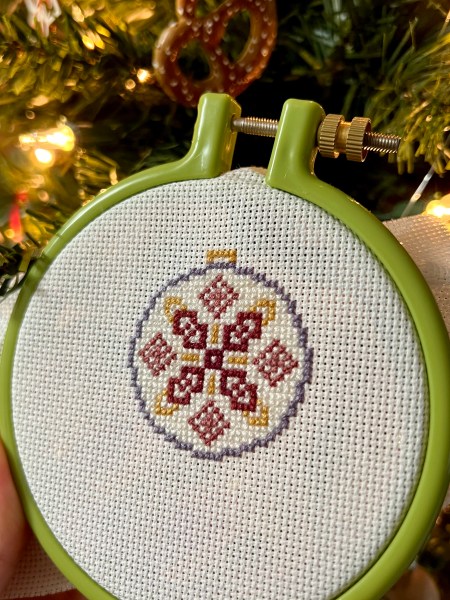
Day 5: Ornament

This is the only pattern changed due to colour play from the 18-count Aida cloth version. While the original 14-count version looked great in all red and white, as soon as I introduced the gold colour, I knew this had to be in the final design.
Day 6: Sleigh
I only stitched the 14-count version of this cross stitch. Unfortunately, I forgot to take a photograph of it finished as an ornament. Thankfully, I did take some pictures before making any cuts, just in case things didn’t go as planned.
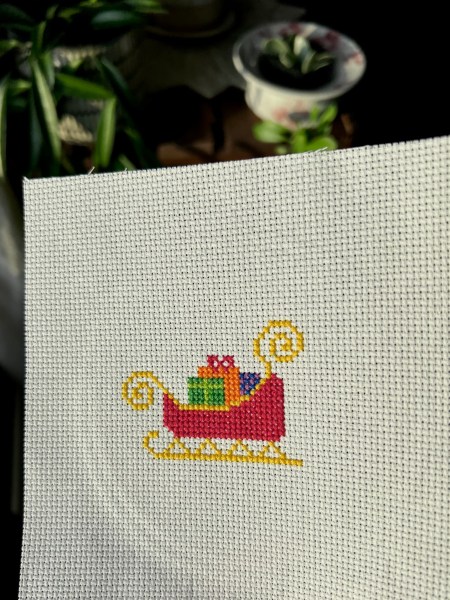
Also, I typically use DMC fabric, but I experimented with two off-brand fabrics from Amazon for the 14-count samples. Unfortunately, both fabrics were quite stiff, and they didn’t soften even after washing. While this might work well for framing, I recommend sticking with the DMC brand if you have other uses in mind.
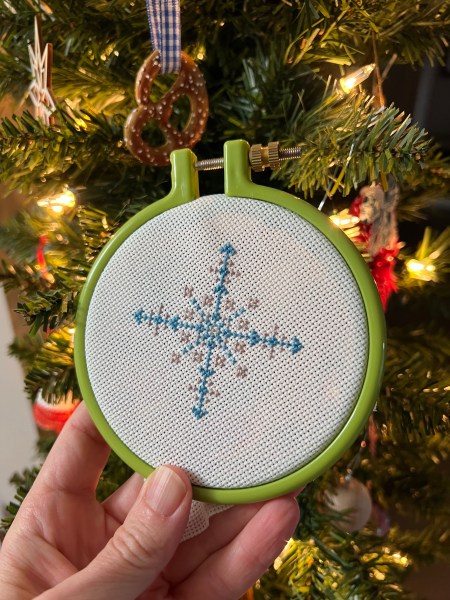
Day 7: Winter
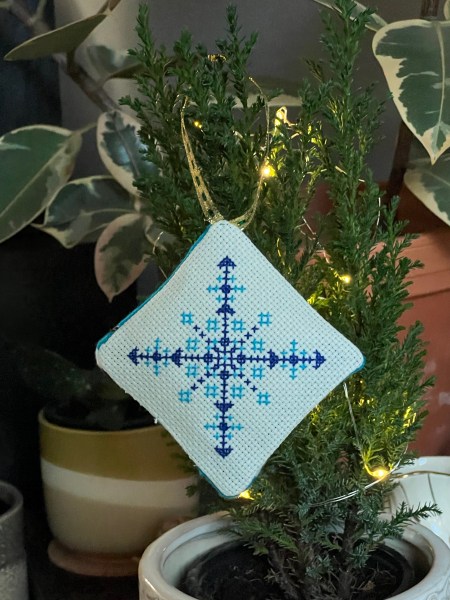
If you have been following me on Instagram, you may have noticed my recent exploration into geometric designs. This snowflake naturally adopted a similar style. Stitched in cool tones, it brings a wintry vibe, hence the name. In the second version, the warmth from the purple tone softens the mood.
Day 8: Snowman
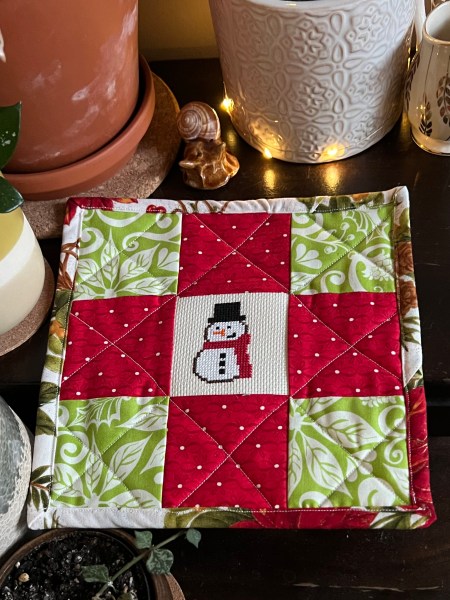
Cute right!? I held three strands to stitch the hat in the 14-count version. In hindsight, dark charcoal for the hat and a softer red for the scarf would have been a better choice for the smaller-scale, 18-count version where the colours appear quite bold.
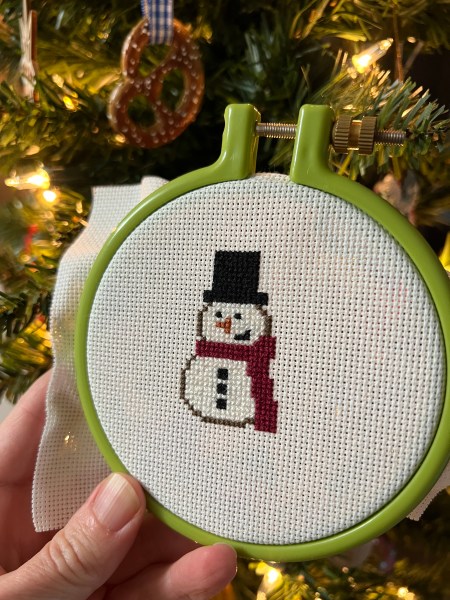
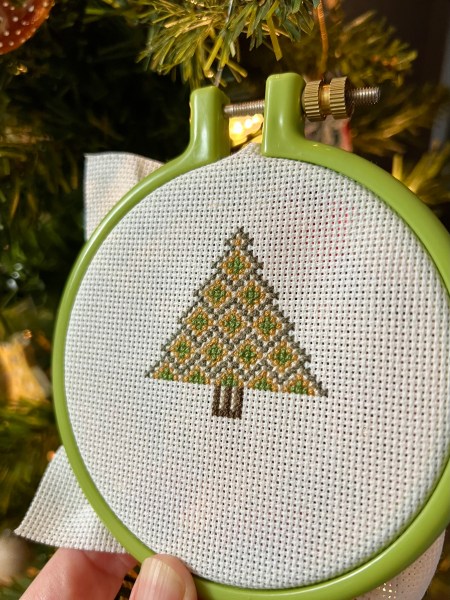
For this cross-stitch and the next one, I finished them into these charming coffee/pot/plant mats. Really whatever you would like to use them for. I used a straightforward quilting pattern of nine squares; each square measuring 3 ½ inches. I might make more since it is a great way to practice my quilting and binding techniques.
Day 9: Tree

This was the first design that kicked off this whole Christmas cross-stitch project idea for my mom and sister.
I think that it looks great on both 14 and 18-count Aida cloth!
Day 10: Lights
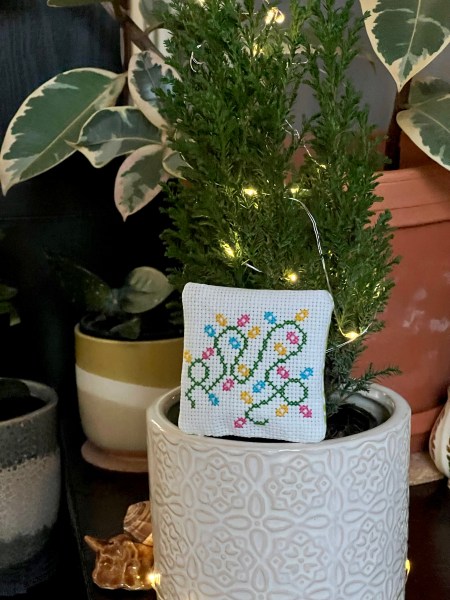
This simple cross stitch makes me happy in both bright and subtle colour pallets.
I finished this (and Day 11) similar to the ornaments but instead of the traditional filling, I opted for lavender, transforming them into holiday sachets!
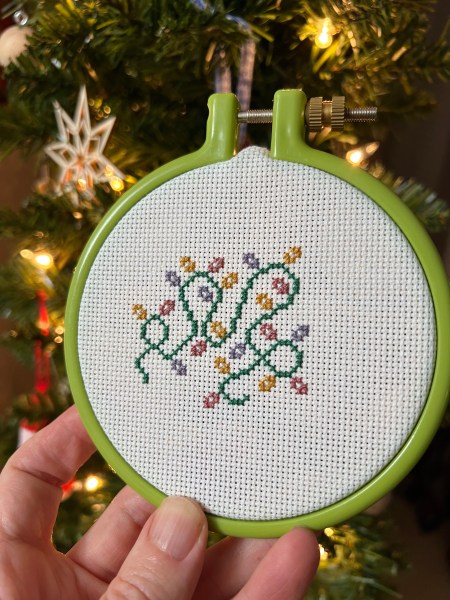
Day 11: Wreath
I don’t know about you but I keep every useable strand of floss, even if it’s a few inches long. This cross-stitch pattern was designed to help make the most of those leftovers.
Don’t worry about which colours go where, simply fill in the spaces with whatever you have!
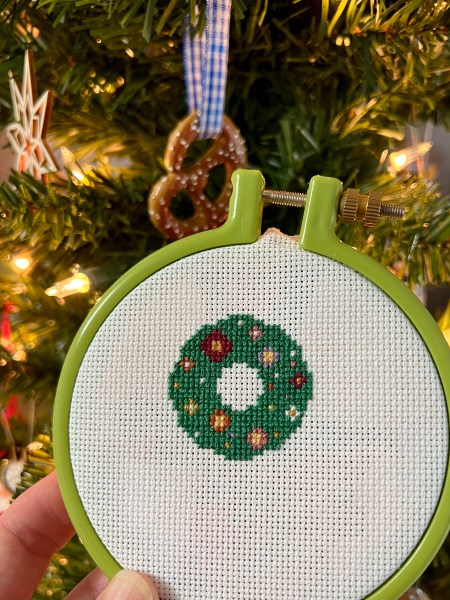
I apologize that I can only share the 18-count version with you. Sadly, the 14-count picture is a little blurry.
If I do a similar project next year, I will review and edit all the photos thoroughly before sending them out as gifts.
Day 12: Schnecke
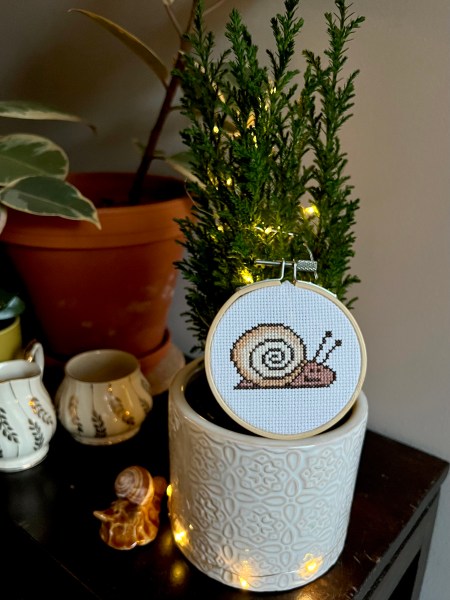
Schnecke (Snail) is an inside joke in my family and since this Christmas Cross Stitch projects were designed for them, it had to be included.
I decided to finish it in this 3” bamboo hoop as Ysolda Teague’s instructions on her website.

I tried a few ways to fade the gradient for the shell: both versions I like but the 14-count is what is on the pattern. I encourage you to play around with it yourself. It is apparent on this pattern again that the 18-count version looks darker and condensed even using the same floss colours.
Thank you
I have really enjoyed making this little Christmas Cross Stitch and sharing it for free to everyone. I plan to update this post once I’ve used my 18-count versions in a project, hopefully in the New Year.
Thank you so much for stitching along. Whether you celebrate Christmas or not, I hope you have found something fun here to stitch, maybe even the snail! Happy Holidays!!
